


 My friends who garden were restraining themselves from peeking at seed catalogs last month. However, this month, all bets are off. Even though the days are only minutes longer, they are itching to get their hands into dirt.
Me, I know that I will have little to no luck growing anything but raspberries and very leggy mint in my backyard. The story is worse in the front yard where the walnut tree will kill tomatoes, potatoes, eggplant, broccoli, kale — it’s safe to say most of my favorite vegetables with the exception of swiss chard, squash, and onions.
But you don’t have to wait for spring to grow something for your plate. You don’t even have to have a yard, let alone one free of walnut trees. Micro greens are a great way to get some extra color and vitamins during the winter. And, you don’t have to wait two and a half months to harvest what you sow. You’ll see your crop in a few days and be able to eat it a week later.
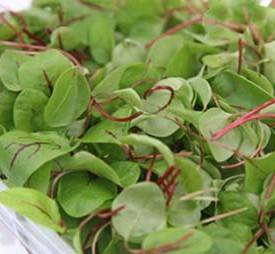
With micro greens, you aren’t growing roots or fruits, only seedlings. Any crop that you can buy in the grocery store as a sprout, you can grow as a micro green. Broccoli and radish make great micro greens, albeit a bit milder than their sprout versions. But you don’t have to limit yourself to sprout crops. Arugula, amaranth, fennel, ox blood beet, red kale, and sunflowers make excellent micro crops. Add them to salads and sandwiches or to dishes like pasta, omelets, and tacos.
Prior to planting, you’ll want to soak the seeds of crops like beet, sunflower, and kale for eight to ten hours. Mucilaginous seeds, those that form tiny gelatin like sacks around the seed, like arugula and most mustards need not be presoaked.
You don’t need any special equipment to grow micro greens, just a clear, lidded plastic take out or deli container. Punch a half dozen drainage holes in the bottom with a pair of scissors, barbecue skewer, or knife. Fill the container with at least an inch of potting soil or soil less mix. Moisten soil. Place container on a plate or drip tray. Alternatively, you can use an opaque pot, filling to within ½ inch of the surface, and covering the pot with plastic wrap after planting.
To plant, evenly spread seeds over the soil surface. Press the seeds into the soil so they make contact with the soil. Place on lid or plastic wrap. When the seedlings sprout, remove the lid/wrap to avoid mold and rot. Place in a sunny window. Keep the soil moist like a damp sponge, but not water logged. A spray bottle is a great tool for watering micro greens. However you water your greens, pour off any extra that collects in the drip tray. As the greens mature, you’ll want to water more deeply less frequently.
You can harvest your micro greens when the first true leaves appear between the initial seed leaves, usually between 10 and 14 days after planting. Harvest your crop with scissors. Rinse off any dirt, spin or pat dry like lettuce. Eat them immediately or store in a produce bag in your refrigerator crisper.
Because you are taking all the leaves, the remaining stems will not regrow. Pull them out and compost them. Stir the soil with a fork, moisten it if necessary, and replant. Stagger your plantings by a week and you can harvest every week until it’s actually warm enough to plant outside.