


 Tromp around an abandoned farmstead in East Central Illinois and you’re likely to still find a patch of “pie plant” somewhere on the property. However, this year’s record wet weather is keeping a lid on our area’s usually prolific rhubarb yields, say area growers. So, if you are going to acquire some local rhubarb, plan on making it to The Market at the Square early and soon. When the heat of summer hits, the plants will stop producing until fall.
If you opt to plant your own rhubarb, you’ll have to wait a couple of years before harvesting it to allow the plant to be able to support a crop and make enough food over winter. Like grass, rhubarb reproduces from roots, actually rhizomes, as well as from seeds. If you are lucky enough to obtain a start of rhubarb from a friend or a garden center, you will have several plants in only a few years. The only things that seem to be able to kill rhubarb are walnut trees.
Rhubarb was used as an ulcer treatment, laxative, and sinus remedy for centuries before sugar became cheap enough to entice people to cook with it. Green house grown rhubarb tends to be sweeter and more tender, which is why you can find it steamed with white asparagus in salads in Europe. However, here, where no one is going to allocate precious greenhouse space to grow a crop that can reproduce like a weed even untended, rhubarb is relegated to the dessert table.
Like pickled beets, there is no fence sitting with rhubarb. Though, when people claim not to like it, the reason typically has more to do with texture than tartness. Larger, older stalks tend to be stringy. And while you can peel them, the best rhubarb is typically thumb-sized in diameter, deep ruby in color, and crisp enough to snap like a green bean.
Scones are a great way to introduce rhubarb to kids. Finely chop a quarter cup of rhubarb and put it on a cookie sheet in your freezer. When frozen, add it to scone dough in place of raisins. You also may want to add a teaspoon or more of dried ginger. A tablespoon of candied ginger is nice, as well.
Mixing rhubarb with strawberries also is a great way to get finicky eaters to try it.
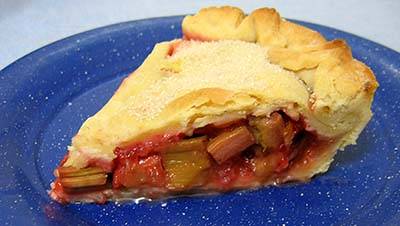
Strawberry Rhubarb Pie
Preheat oven to 400 degrees F
Crust
- 2 1/4 c unbleached all-purpose flour, plus extra for dusting work surface
- 1 t salt
- 2 T granulated sugar
- 11 T chilled unsalted butter, each cut into 4 pieces
- 7 T chilled vegetable shortening
- 1/3 c ice water
Combine all ingredients except water in a food processor. Pulse until dough resembles coarse meal. Add water a couple of tablespoons at a time and pulse until dough just comes together in a ball. (If flour is very dry from storage, you may need to add an extra tablespoon of water.) Remove dough from processor.
No food processor? No experience with pie crust, or need a refresher course? Watch this video to see how you can mix pie dough with just a fork and your kitchen counter.
Regardless of which method you use, you’ll want to divide the dough in half and flatten each half into a disk. Wrap each in plastic or parchment and chill 30 minutes.
Filling
- 3 c ripe strawberries, hulled and sliced
- 3 c fresh rhubarb, trimmed and cut into 3/4-inch pieces
- 3/4 to 1 c granulated sugar (use more if strawberries are tart)
- 2 t lemon juice (optional)
- 1/4 t ground nutmeg (optional)
- 3-4 T quick-cooking tapioca (use 4T if fruit is juicy, or you like a thicker filling)
- 1 T unsalted butter, cut into small pieces
Mix fruit, sugar, tapioca, and if using, nutmeg and lemon juice. Allow to stand 15 minutes so the sugar can draw out enough moisture to allow the tapioca to gel the pie in the oven.
Assembly
Allow dough to warm up 10 minutes before rolling out on a floured surface. No rolling pin? Use a clean section of an old broom handle (remove any paint or varnish with sand paper) or an unopened large canned beer like Foster’s.
Roll first dough disk on lightly floured surface into 12-inch circle, about 1/8-inch thick. Transfer dough to 9-inch pie pan. Gently place dough into pan without stretching it. (See video for tips.) Allow any dough to overhang pie, don’t trim. Pour fruit mixture and any juice, into pie shell. Scatter butter over filling. Chill pie in fridge while you roll the top crust.
Transfer top dough to pie. Trim edges to 3/4 of an inch beyond the rim of the pan. Fold the edges underneath or on top so the fold is flush with the edge of the pan. Use your fingers or a fork to flute the crust to seal it. Note: The more you work the crust edges, the faster they will cook, so you may want to use a fork the first time out. Then, cut four slits about 1-inch long about 2 inches from the center of the pie at the 12, 3, 6, and 9 o’clock positions to allow steam to escape. If the pie dough is very soft, place it in the freezer for 10 minutes before baking.
Place pie on a cookie sheet to catch any drips. Bake for 20 to 25 minutes. Reduce temperature to 350 degrees F and bake for 30 to 40 minutes more, until juices bubble and crust is golden brown. Allow pie to cool on a wire rack, or borrow a stove burner grate, for one to two hours to allow the filling to thicken.